


DIY
How to Build Your Own Bench Seating
Experienced DIYer Ashley Mayes created the perfect bench seating for lounging in her newly renovated kitchen.
By Jenna DeJong
Sep 2017
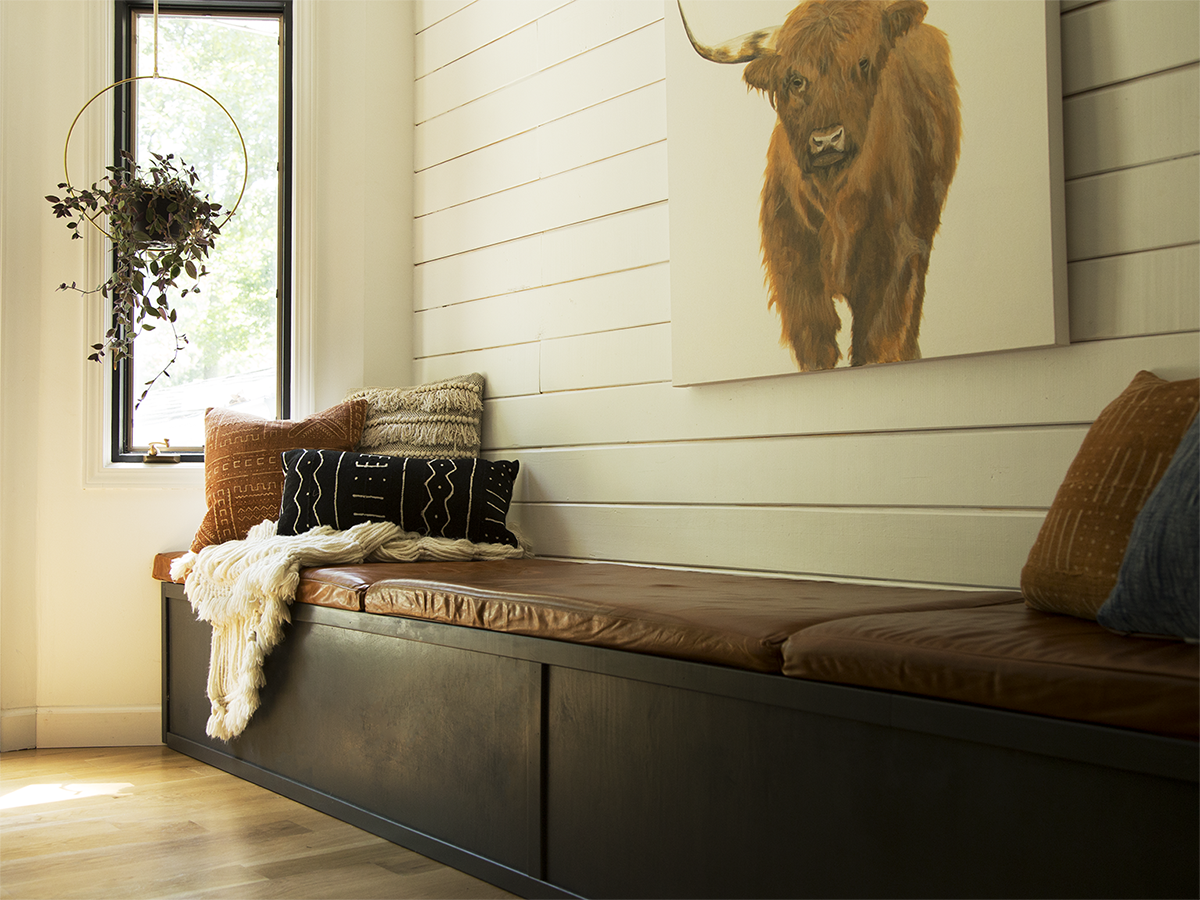
Photo by Halie BransonAdding pillows and a throw blanket can accent your DIY seating and provide an extra level of comfort and style.
After making benches and a queen-sized bed, experienced DIYer Ashley Mayes decided to test her creative hand by making a custom-built banquette.
Four years ago, Mayes and her family moved back to Springfield, bought a house and started renovating to make a new home feel like their own. Around the same time, she started Bigger than the Three of Us, a blog that caters to beginning crafters interested in revamping their home’s style. Since then, she has uploaded photos, written how-to tutorials for projects and renovations and shared budget-friendly finds from the web.
Her latest and greatest spurred from her kitchen renovation. While working on the space, Mayes decided an open wall was the perfect place for additional seating. “The space needed to be cozy and relaxing,” Mayes says. “I wanted a place my son could sit and eat a snack or work on homework.” She and her husband are constantly switching things up, so she decided not to attach the banquette to the wall or use it for storage.
The area she worked on was 14 feet long compared to the smaller benches and reading loft Mayes had made for her son, the banquette is much larger in size. Because it was her first time making a bench that big, Mayes says she would tweak her process if she ever repeated the project. “I would use a higher quality [wood] on the front because I feel like the plywood gets scratched easier,” Mayes says. “That also sometimes happens with black paint. Darker colors show more imperfections.”
Regardless of these imperfections, Mayes says she is thrilled with the result. “It gets used daily and for more than just eating,” she says. “We like the way we built the banquette with its most recent update. Originally we didn’t add the trim to the front, but the trim definitely added the missing touch.”
Since she has finished, Mayes’s project has been shared over 8,000 times on social media, and Mayes continues to help subscribers with unforeseen problems. For more information on this and other projects from Mayes, visit her blog.
DIY Your Own Banquette
Supplies
4 12-foot 2-by-4 boards
2 8-foot 2-by-4 boards
2-inch wood screws
Hitachi C10FCE2 15-amp single bevel compound miter saw
Kreg jig K4 pocket hole system
¾-inch particle board cut at the store
Air compressor and nail gun
Wood glue
Primer and paint
Foam
Batting
Fabric
Stapler
2 sanded and finished plywood boards, cut to 62 inches by 24.5 inches
Directions
1. Measure your wall that the banquette will be sitting against. Cut four 2-by-4 boards to one inch shorter than the wall’s length.
2. Cut 12 2-by-4-inch supports at 9.5 inches for upright supports. Cut six floor supports at 20.5 inches.
3. Attach floor supports first. Drill starting from the long 2-by-4 boards on each side. Mayes eyeballed the spacing.
4. Use the Kreg jig to make holes to attach the screws on the support to the bottom 2-by-4 boards on each of your upright supports. Mayes also used wood glue for extra reinforcement. On the 2-by-4s against the wall, mark where your upright 2-by-4 boards hit and use the Kreg jig and wood glue to attach the boards.
5. Cut six more 2-by-4 supports at 20.5 inches. Attach with Kreg jig and wood glue. Screw into the supports from the outside on both sides. Again, Mayes eyeballed the placement.
6. For the next step, Mayes had a hardware store cut her particle board to 24 inches by 167 inches for the top. Attach by drilling screws down into the frame.
7. Use screws to attach the particle board to the 2-by-4 frame.
8. Layer foam, batting and fabric to create the cushions. Staple to wooden supports, pulling the material tightly to fit.
9. Cut ¼-inch plywood to size for the front and side panels. Prime, paint and attach with a nail gun. Fill any nail holes with nail filler, let dry, sand and paint. Add wooden trip pieces for a final touch.
Find the online tutorial with step-by-step pictures and more details here.